Titanium anodizing is an electrochemical process that grows a transparent oxide layer on the metal’s surface — no dyes involved. The color you get is controlled entirely by voltage: around 20–25V produces purple/dark blue, 30–40V gives sky blue, 50–55V gives gold, and 80–100V reaches teal/green. To do this at home you need a variable DC power supply (0–120V, at least 1A), a dilute electrolyte solution (5g/L TSP or Borax in distilled water), titanium wire for your anode circuit, and a clean stainless steel or titanium cathode. The single biggest failure point isn’t the power supply — it’s surface prep. Oil from a single fingerprint will leave a silver thumbprint on your blue part. This guide covers every step, the real voltage chart, a full troubleshooting table, and what nobody else mentions: why your titanium grade determines whether your colors will be gem-bright or disappointingly dull.
What Actually Happens When You Anodize Titanium
Titanium already has a paper-thin native oxide on its surface — that’s part of why it’s so corrosion-resistant. When you run current through it in an electrolyte bath, you’re not depositing anything. You’re forcing that oxide layer to grow thicker in a controlled way.
The color you see isn’t pigment. It’s physics — specifically thin-film interference, the same optical effect that makes soap bubbles or oil slicks iridescent. When light hits the titanium dioxide (TiO₂) surface, some reflects off the top of the oxide layer and some travels through the transparent film and reflects off the metal underneath. Those two reflected waves interfere with each other. Depending on the thickness of the film, certain wavelengths cancel out and others amplify — and that’s the color you see.
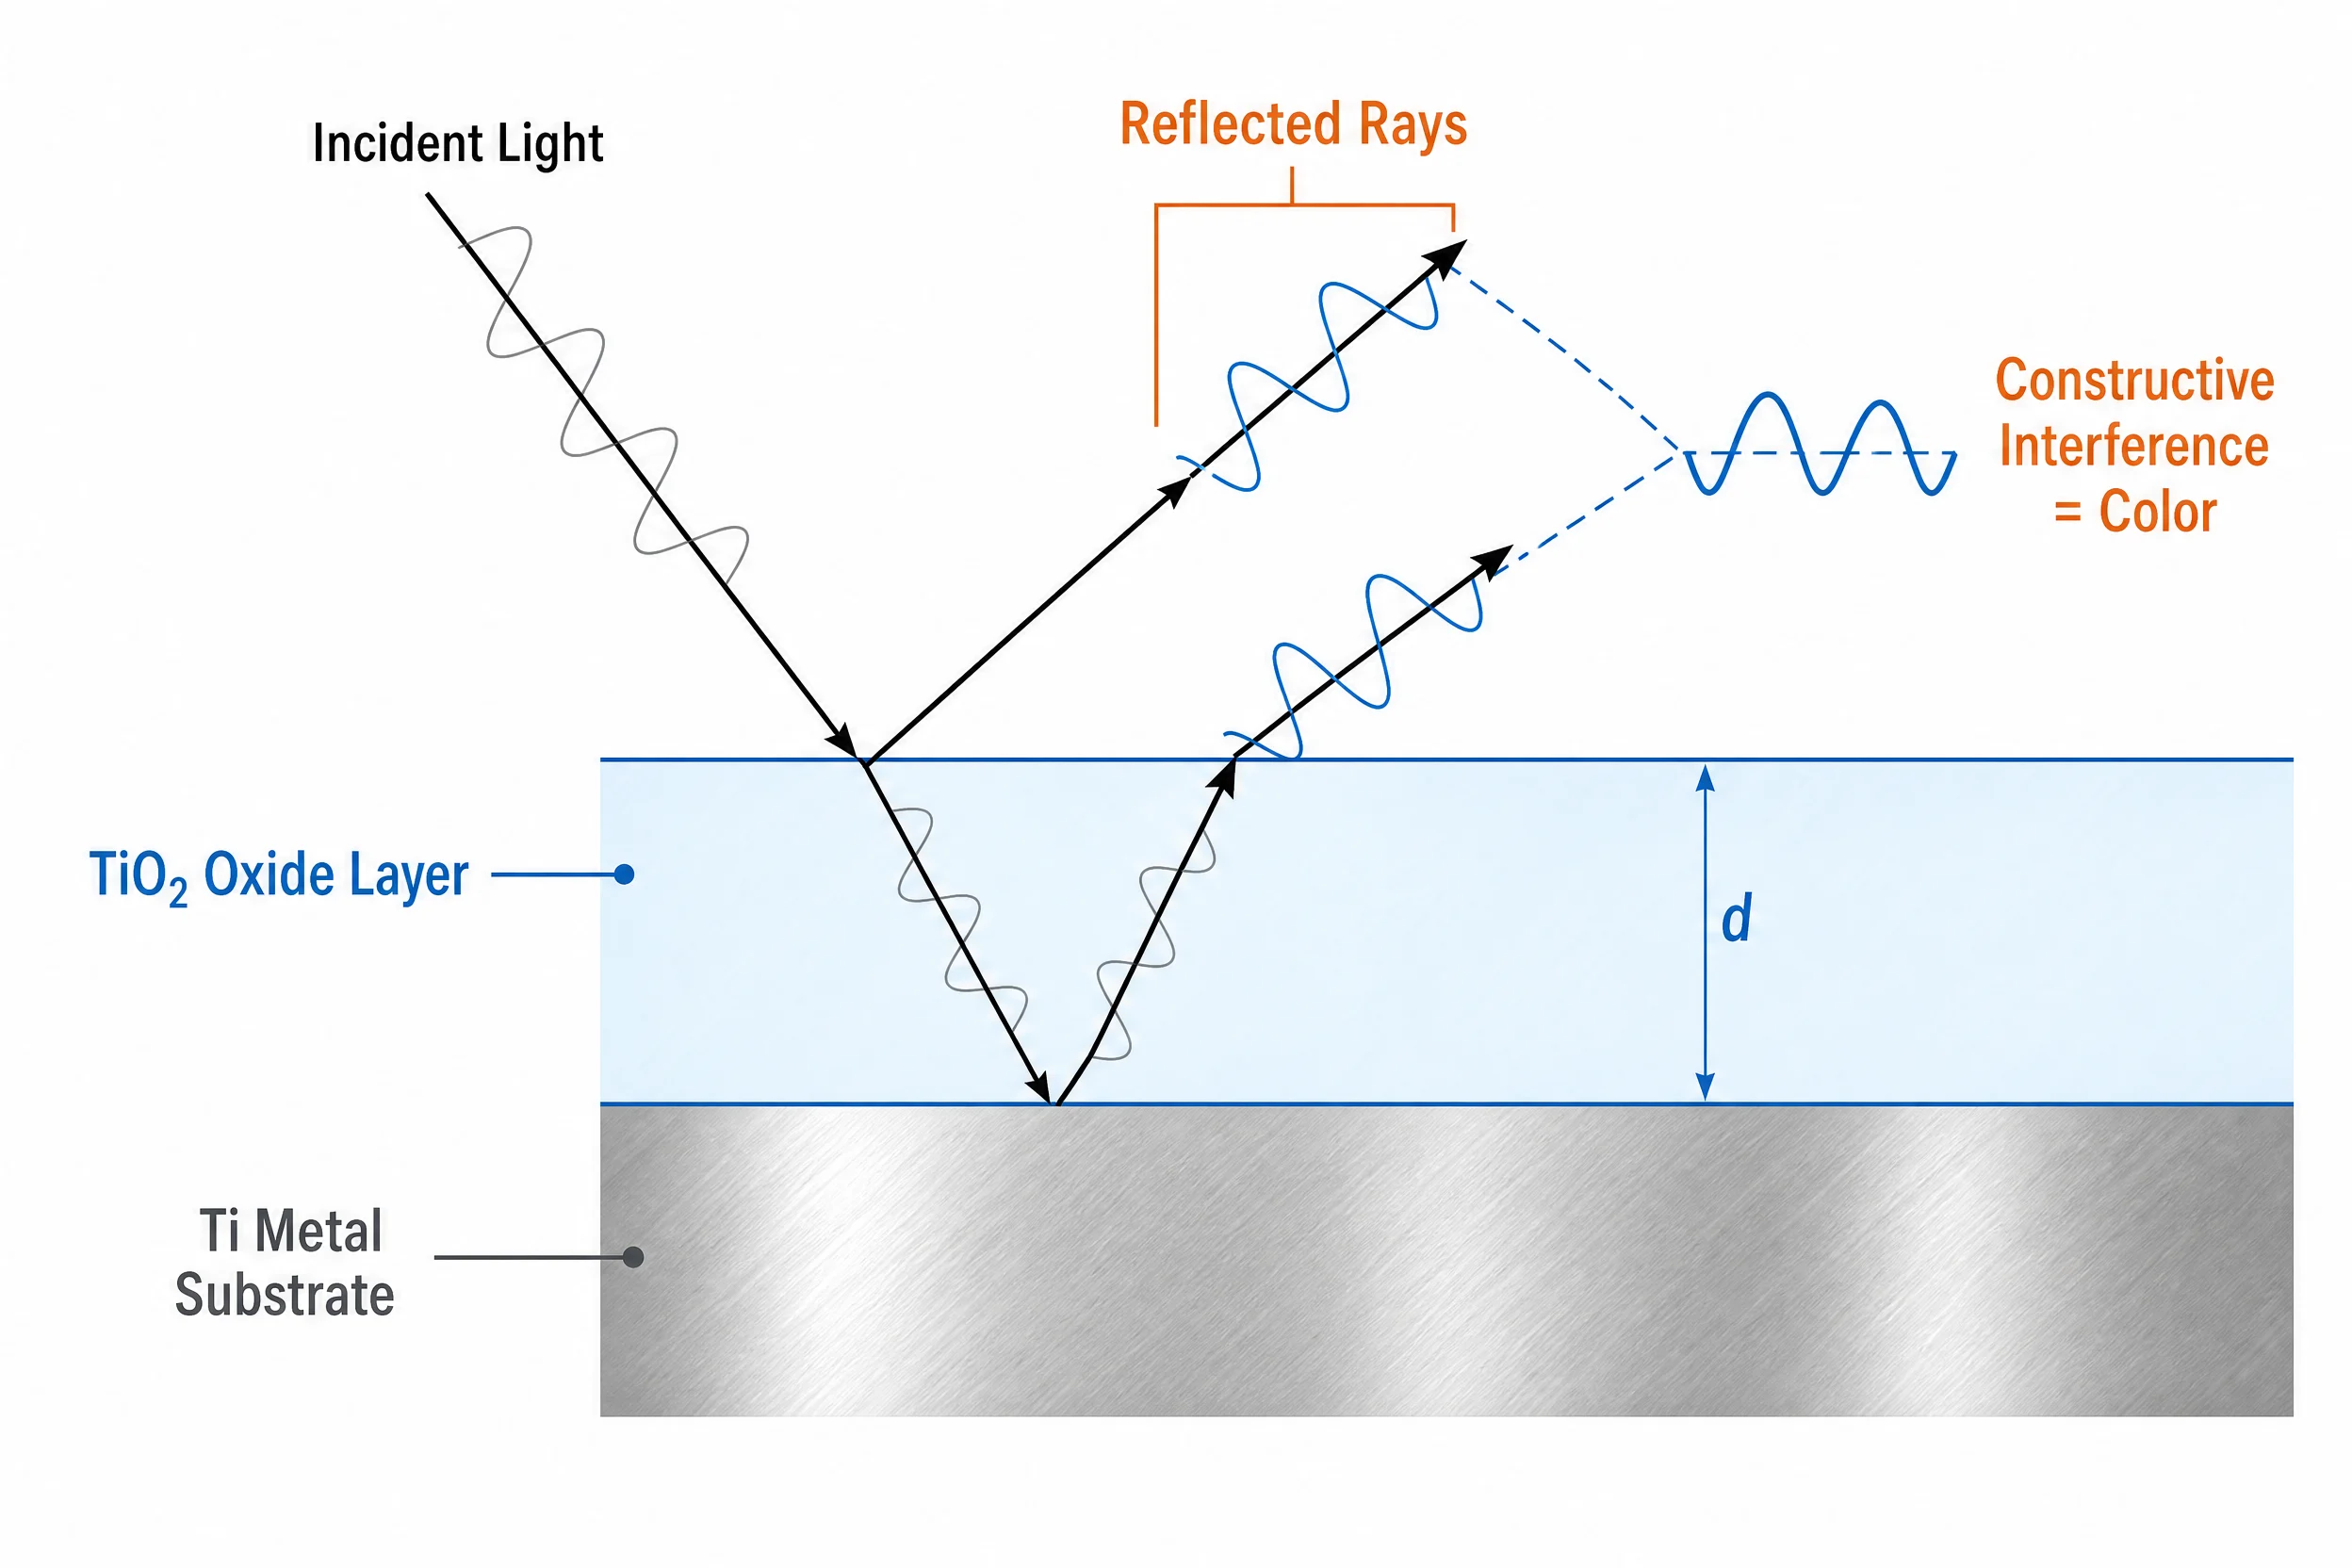
Voltage controls oxide thickness. Oxide thickness controls color. That’s the whole mechanism. Academic research (Kang et al., Materials Characterization, 2017) confirms the growth is linear — roughly 1.9–2.1 nm per volt with alkaline electrolytes — which is why the color progression is predictable and repeatable.
This is also why two important colors are physically impossible with standard anodizing:
- True black — would require absorbing all light, which the thin transparent oxide can’t do. “Black titanium” is almost always a PVD or DLC coating.
- Fire-engine red — the interference pattern can produce pinks, purples, and reddish-browns, but not a pure saturated red.
One thing worth knowing upfront: voltage is cumulative. Once you’ve grown a 30V blue oxide layer, raising to 50V will shift it toward gold. But you can’t lower the voltage and go backward. If you overshoot a color, you need to strip the oxide chemically and start over. This isn’t in most tutorials, and it’s responsible for a lot of ruined first attempts.
What Titanium Grade You’re Working With Changes Everything
Most tutorials treat titanium as a single material. It isn’t — and this is the most overlooked reason DIY results disappoint.
Grade 2 (Commercially Pure Titanium) contains almost no alloying elements, so when it anodizes, you get a clean, consistent TiO₂ film. Colors come out gem-bright. That vivid iridescent purple you see in social media videos? Almost certainly Grade 2 or Grade 1.
Grade 5 (Ti-6Al-4V) is the structural workhorse used in aerospace fasteners, high-end knife scales, and EDC hardware. It contains nominally 6% aluminum and 4% vanadium (per ASTM B265). Those alloying elements form their own mixed oxides during anodizing, disrupting the optical purity of the film. The result: colors that are noticeably more muted and matte. A 50V “gold” on Grade 5 often looks more like dark antique brass than bright yellow gold.
This isn’t a failure of your setup — it’s physics. If you’re working with Grade 5 and expecting Grade 2-level color saturation, you’ll always be disappointed. For jewelry and decorative work where color vibrancy matters, Grade 2 is the right material choice. For structural parts like knife scales where strength is the priority, Grade 5’s muted palette is just part of the tradeoff.
One practical implication: if you’re anodizing a mixed batch containing both grades, anodize them in separate sessions at the same voltage. Even at identical settings, the two grades will come out different shades, and there’s no adjustment to fix that.
The Voltage-to-Color Chart (And How to Actually Hit the Color You Want)
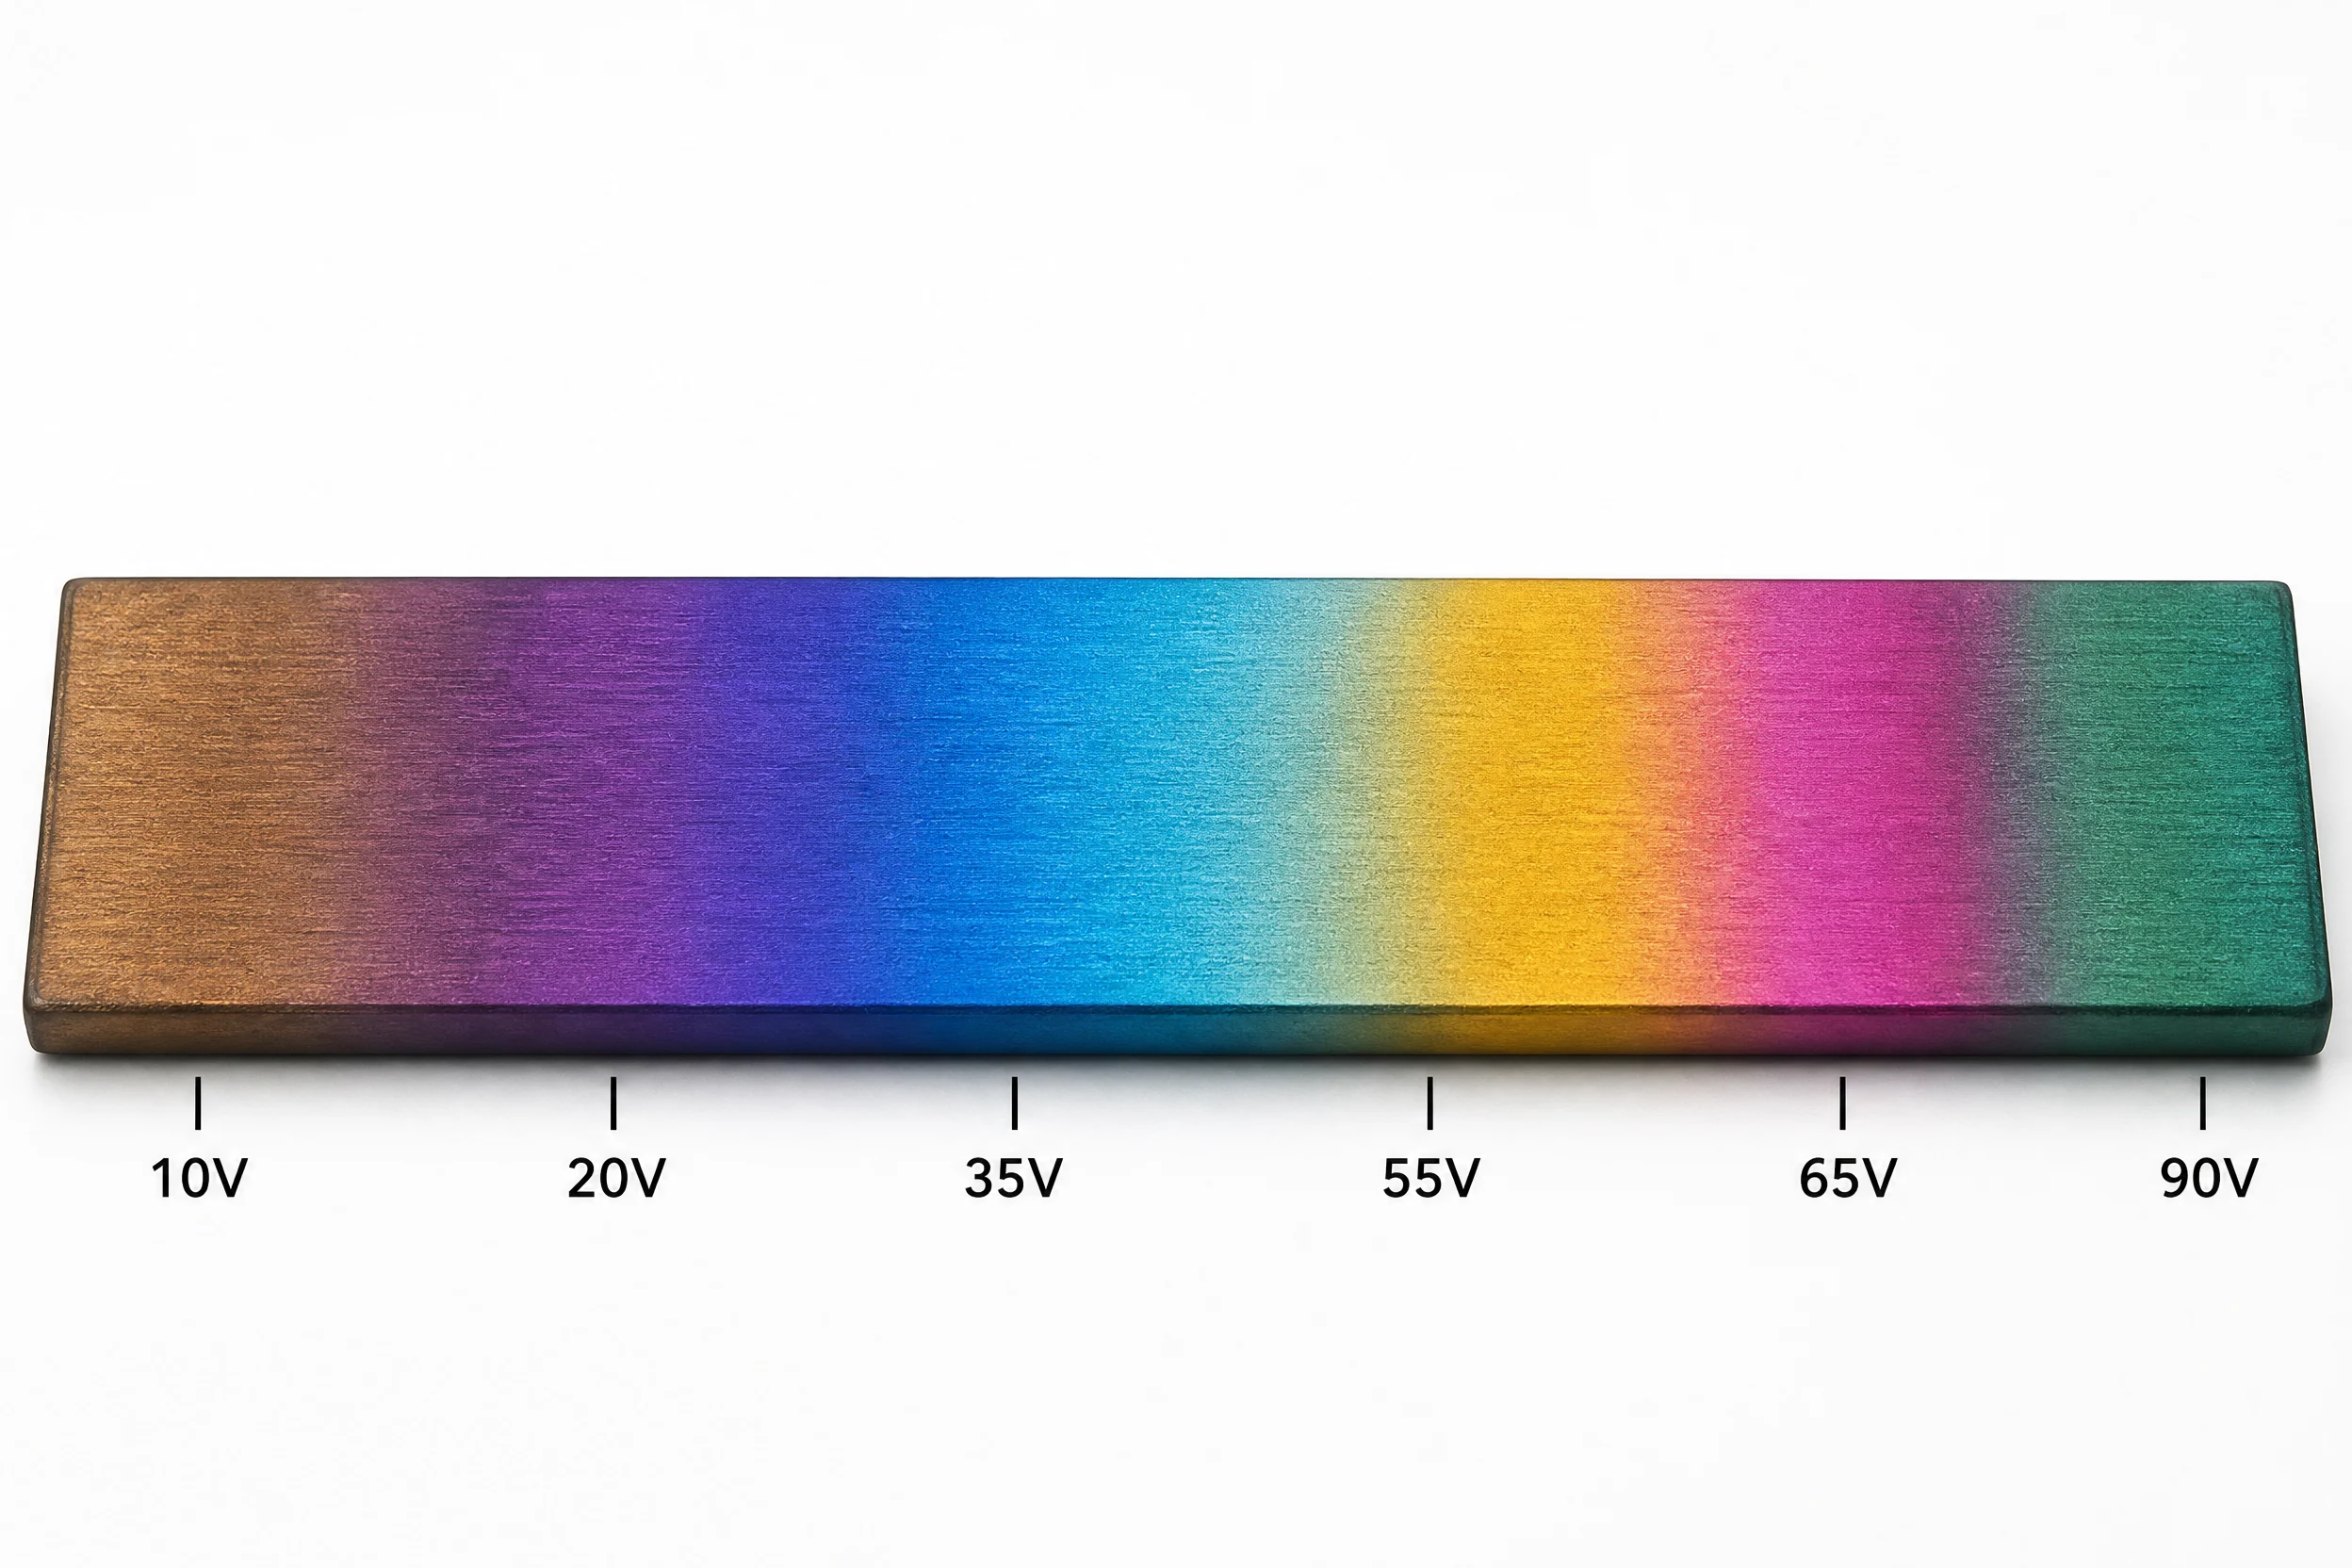
Here’s the reference chart. These values are for DC anodizing on Grade 2 commercially pure titanium with a TSP or Borax electrolyte. The voltage ranges are well-established across industry and community sources (MrTitanium, Best Technology Inc., HonTitan). Oxide thickness values are approximate and electrolyte-dependent — actual thickness scales linearly with voltage at roughly 1.9–2.1 nm/V.
| Voltage (DC) | Color | Notes |
|---|---|---|
| 10–15V | Bronze / Brown | First visible color; subtle warm tone |
| 20–25V | Purple / Dark Blue | Very popular — most vivid on mirror-polished Grade 2 |
| 30–40V | Sky Blue / Light Blue | High-visibility color; popular in aerospace |
| 50–55V | Gold / Yellow | Mimics gold plating; appears as antique brass on Grade 5 |
| 60–70V | Pink / Magenta | Vibrant; harder to achieve on Grade 5 |
| 80–100V | Teal / Green | Requires the cleanest possible surface prep; hardest to control |
(Note: Expect ±3–5V variation based on surface finish, electrolyte temperature, and titanium grade. These values are for alkaline electrolyte — ammonium sulfate or acid systems may shift the spectrum.)
A few things the chart alone won’t tell you:
The spectrum wraps. After green (~100V), if you keep going you cycle back toward bronze-gold tones in a second pass. Most DIYers stay under 120V for this reason.
Colors look different wet vs. dry. Fresh out of the bath, the color will shift when the part dries. Always blow dry with compressed air or wait fully before judging the result.
The “Creep Up” Method for Precision
The most common way to overshoot a color is setting the target voltage before submerging the part. Instead:
- Set your power supply to 10V below your target
- Submerge the part fully (don’t let it touch the cathode)
- Slowly dial the voltage up while the part is in the bath
- Stop when you see the color you want
This gives you real-time visual feedback and accounts for the ±3–5V variance in your specific setup. It also means you can stop at any sub-color between two listed voltages — a blue-purple sitting between 20V and 25V, for example.
Equipment You Actually Need
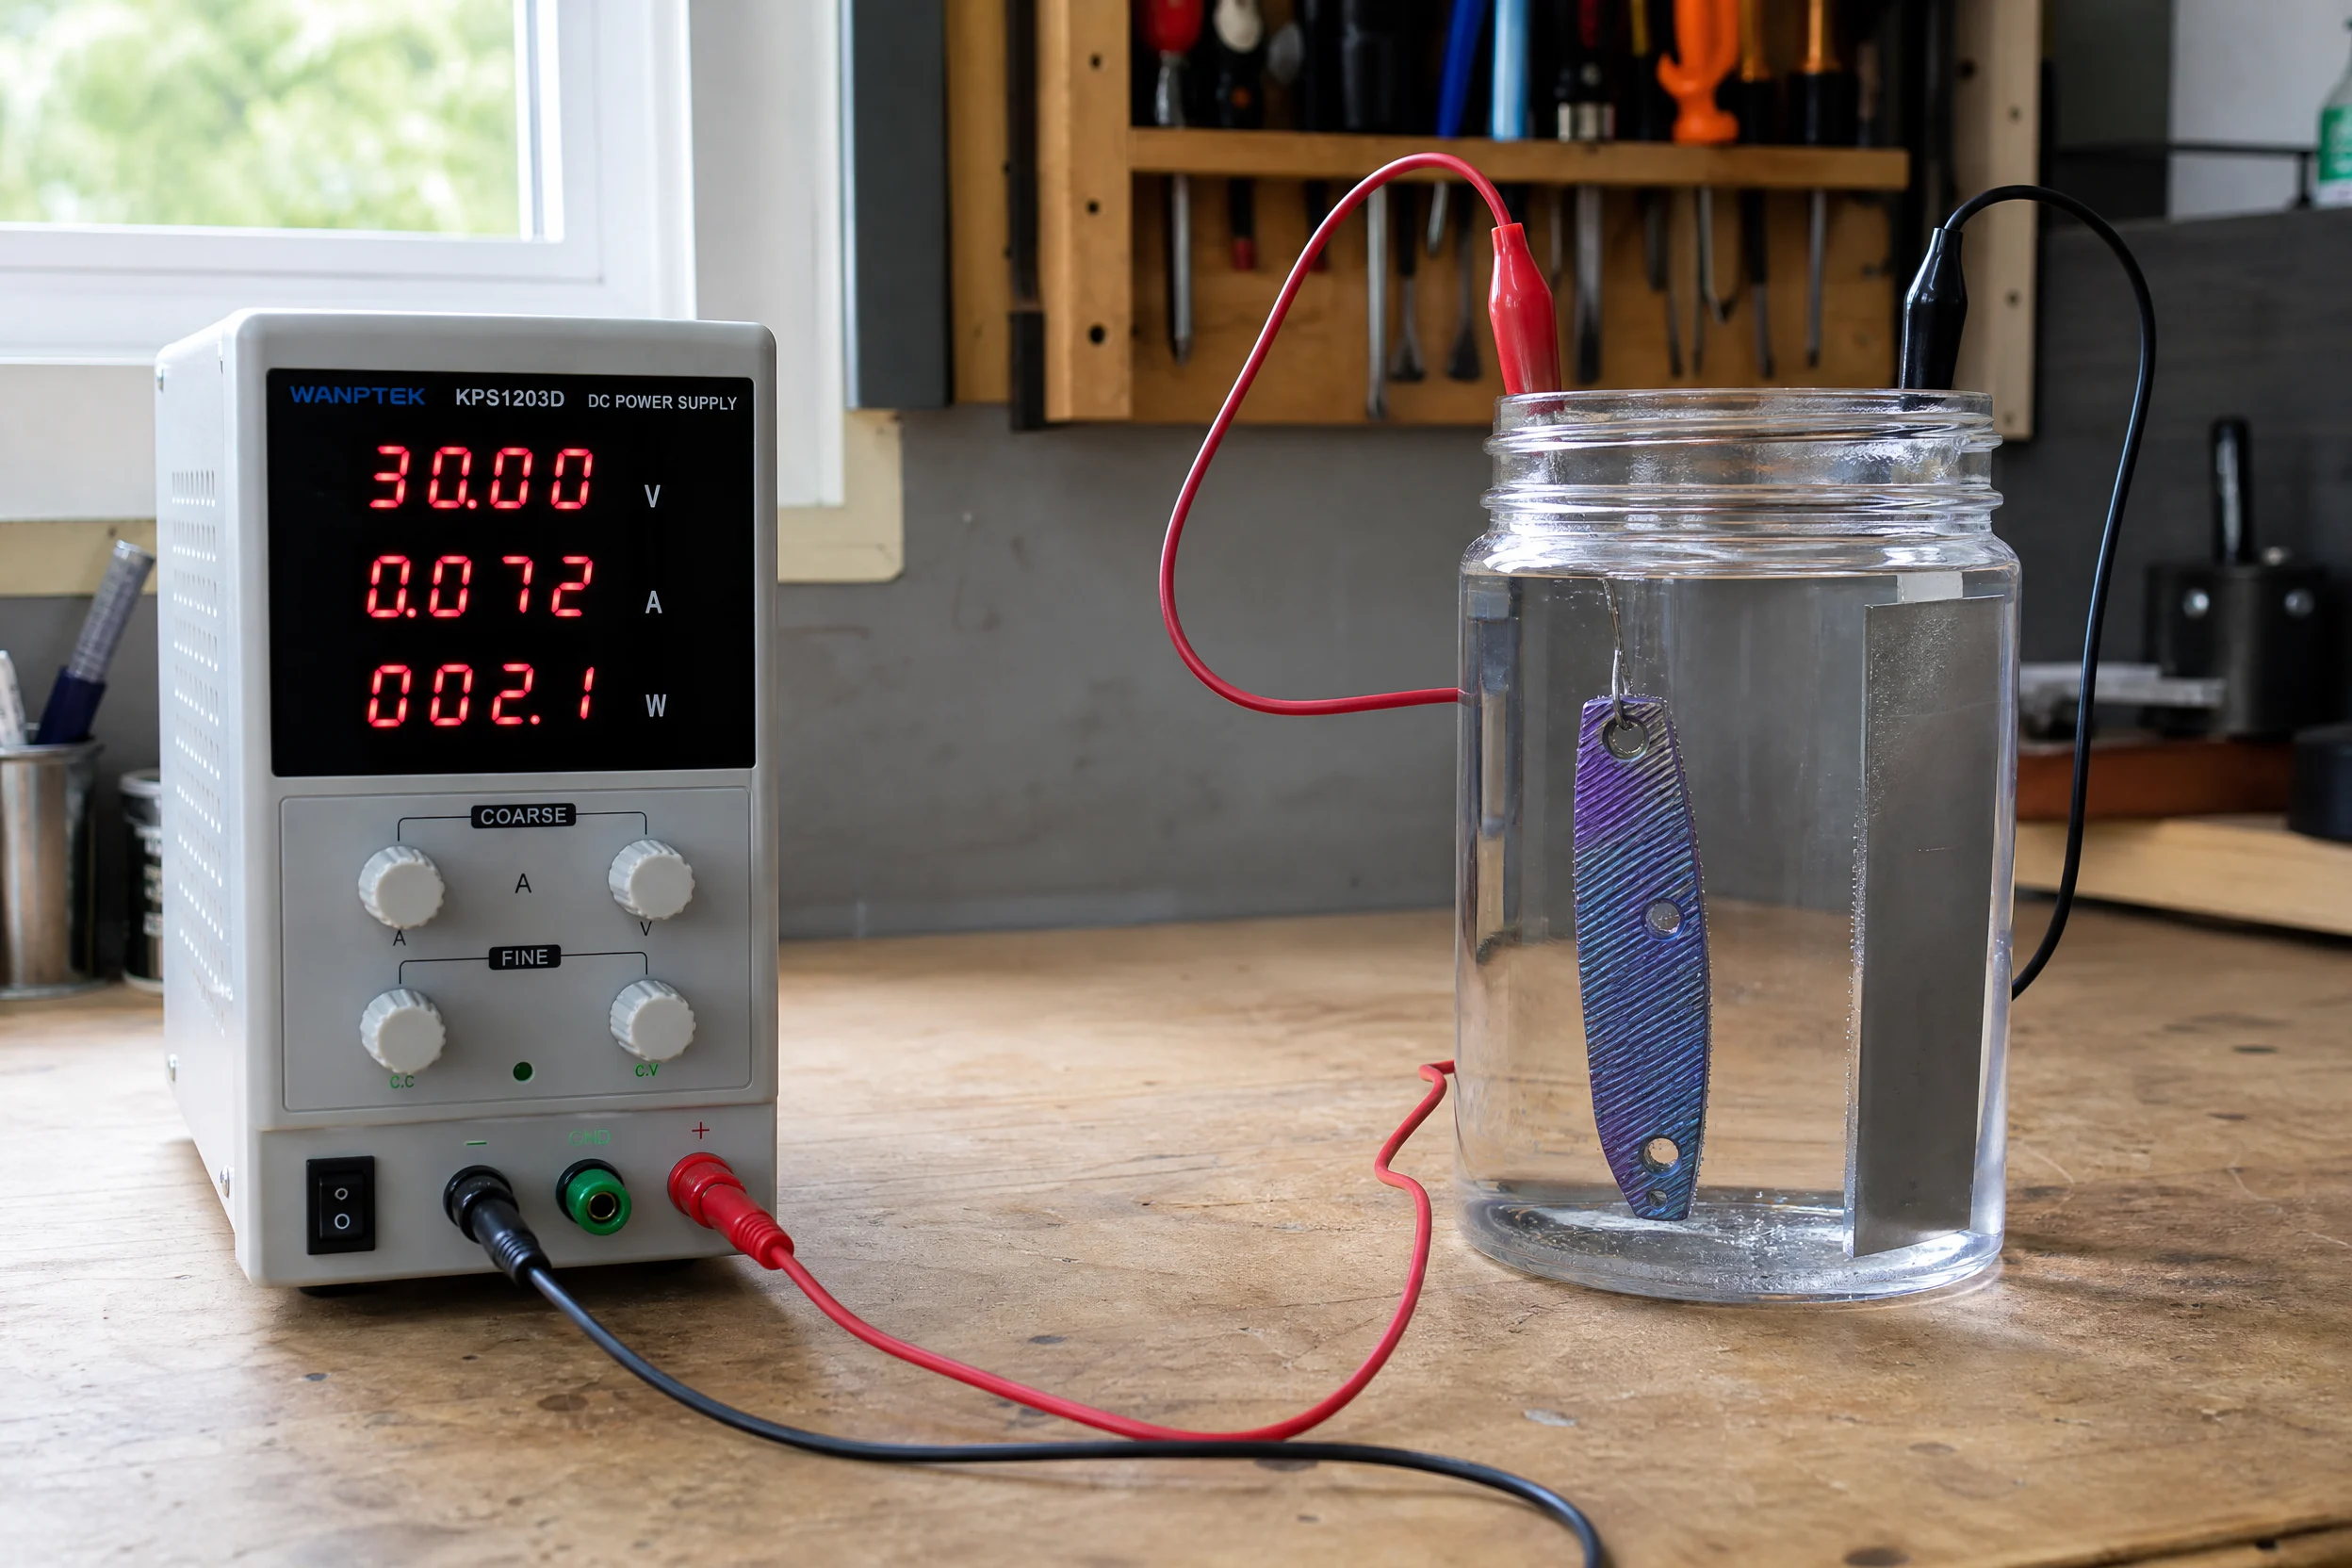
The Power Supply — The One Decision That Limits Everything Else
Every other piece of equipment is cheap and interchangeable. The power supply is the constraint.
You need a variable DC supply that goes from 0 to at least 110V, with current output of at least 1A (3A is better for larger pieces). The color range for titanium anodizing runs from around 10V (bronze) to ~100V (green), with the most popular colors (blues, purples) sitting between 20V and 45V. A supply that tops out at 30V locks you out of half the spectrum.
The most common community recommendation — consistent across BladeForums, Reddit r/knifeclub, and PracticalMachinist — is a Chinese-made 0–120V / 3A adjustable bench supply in the $60–120 range. The specific model matters less than these specs:
- Voltage range: 0–120V DC
- Current range: 0–3A (adjustable)
- Display: Digital readout for both voltage and current
- Regulation: Constant voltage (CV) mode
Can you use a 9V battery? Yes, for small jewelry pieces you want bronze or purple (10–25V range), a stack of 9V batteries works. The real limitation is control: you get one voltage, not variable adjustment, and you can’t do the “Creep Up” method. For anything beyond basic colors or pieces larger than a ring, a bench supply is worth it.
What about a variac + rectifier? Some forum veterans use a variable autotransformer with a bridge rectifier. It works and can be cheaper to build, but the isolation transformer requirement (for safety with AC input) makes the total cost comparable to a dedicated bench supply. Unless you enjoy building power supplies, just buy the bench unit.
The Cathode
The cathode (negative electrode) can be titanium mesh, a scrap titanium plate, or a sheet of stainless steel. The surface area of the cathode should be at least as large as the workpiece — ideally larger.
Never use aluminum or copper as the cathode. Both dissolve into the electrolyte, contaminating the bath and producing inconsistent results.
The Anode Circuit
Every part of the anode circuit that touches the electrolyte must be titanium. This means titanium wire for hanging the part, titanium clips if you use them — not steel, not copper, not alligator clips.
The reason is simple: electricity takes the path of least resistance. A copper or steel connection in the bath will preferentially anodize itself instead of your workpiece, leaving the titanium uncolored. Titanium wire is cheap (available from jewelry suppliers) and non-negotiable.
The Container
Any non-conductive, chemical-resistant container works. A glass jar, a plastic deli container, a Rubbermaid storage bin — all fine. Just make sure it’s tall enough to fully submerge your workpiece without the part touching the sides or the cathode.
Electrolyte Recipe: What to Mix and How Much
The electrolyte’s job is simple: provide free ions so current can flow through the solution. The exact chemistry matters less than two factors — using distilled water and keeping the solution free of chlorides.
The Standard Recipe
TSP (Trisodium Phosphate) or Borax:
- 5g per liter of distilled water (~1 teaspoon per quart)
- This is approximately 1/10 of the saturation point
(Source: MrTitanium: “about 5g/l is a good concentration. The water is what does the work; the salt or acid is just an ion source.”)
Both TSP and Borax produce equivalent results at this concentration. TSP is sold in hardware stores as a wall-washing cleaner. Borax is in the laundry aisle. Either works.
Baking soda (sodium bicarbonate) works too, at roughly the same concentration. Results are slightly less consistent — the solution seems to need more frequent refreshing — but for a first attempt it’s fine and available in any kitchen.
What to Avoid
- Chloride-containing solutions — salt water, anything with table salt — will etch and pit the titanium surface rather than anodizing it cleanly
- Tap water — dissolved minerals affect consistency; distilled water costs $1/gallon and is worth it
- Acids (except for professional setups) — industrial operations sometimes use phosphoric or sulfuric acid, but for home use the TSP/Borax approach is safer and produces comparable results
Electrolyte Maintenance
The electrolyte doesn’t get consumed the way chemicals do in other processes. A single batch will last dozens of sessions. Store it in a labeled, lidded container. If you notice inconsistent results after many uses, mix a fresh batch — the old solution can be heavily diluted with water and used as a plant fertilizer (the phosphates are beneficial).
Surface Prep: Where 90% of DIY Failures Start
Before you think about voltage, before you mix the electrolyte, before you wire anything up — the workpiece has to be clean. Not “pretty clean.” Chemically clean.
Titanium oxide forms based on the surface the electrolyte touches. If there’s oil, residue, or a fingerprint blocking part of that surface, the oxide won’t form there. Instead you get the underlying silver titanium showing through a colored background — which looks exactly like what it is: a thumbprint of failure baked permanently into your part.
Step 1: Degrease
Wipe the part down with acetone or isopropyl alcohol (90%+). For parts with textured surfaces, jimping, or machined grooves, a brief soak in Simple Green followed by a scrub with a soft brush gets into the recesses better than a wipe.
From this point on: nitrile gloves only. The oil from bare skin will ruin the prep.
The Water Sheet Test
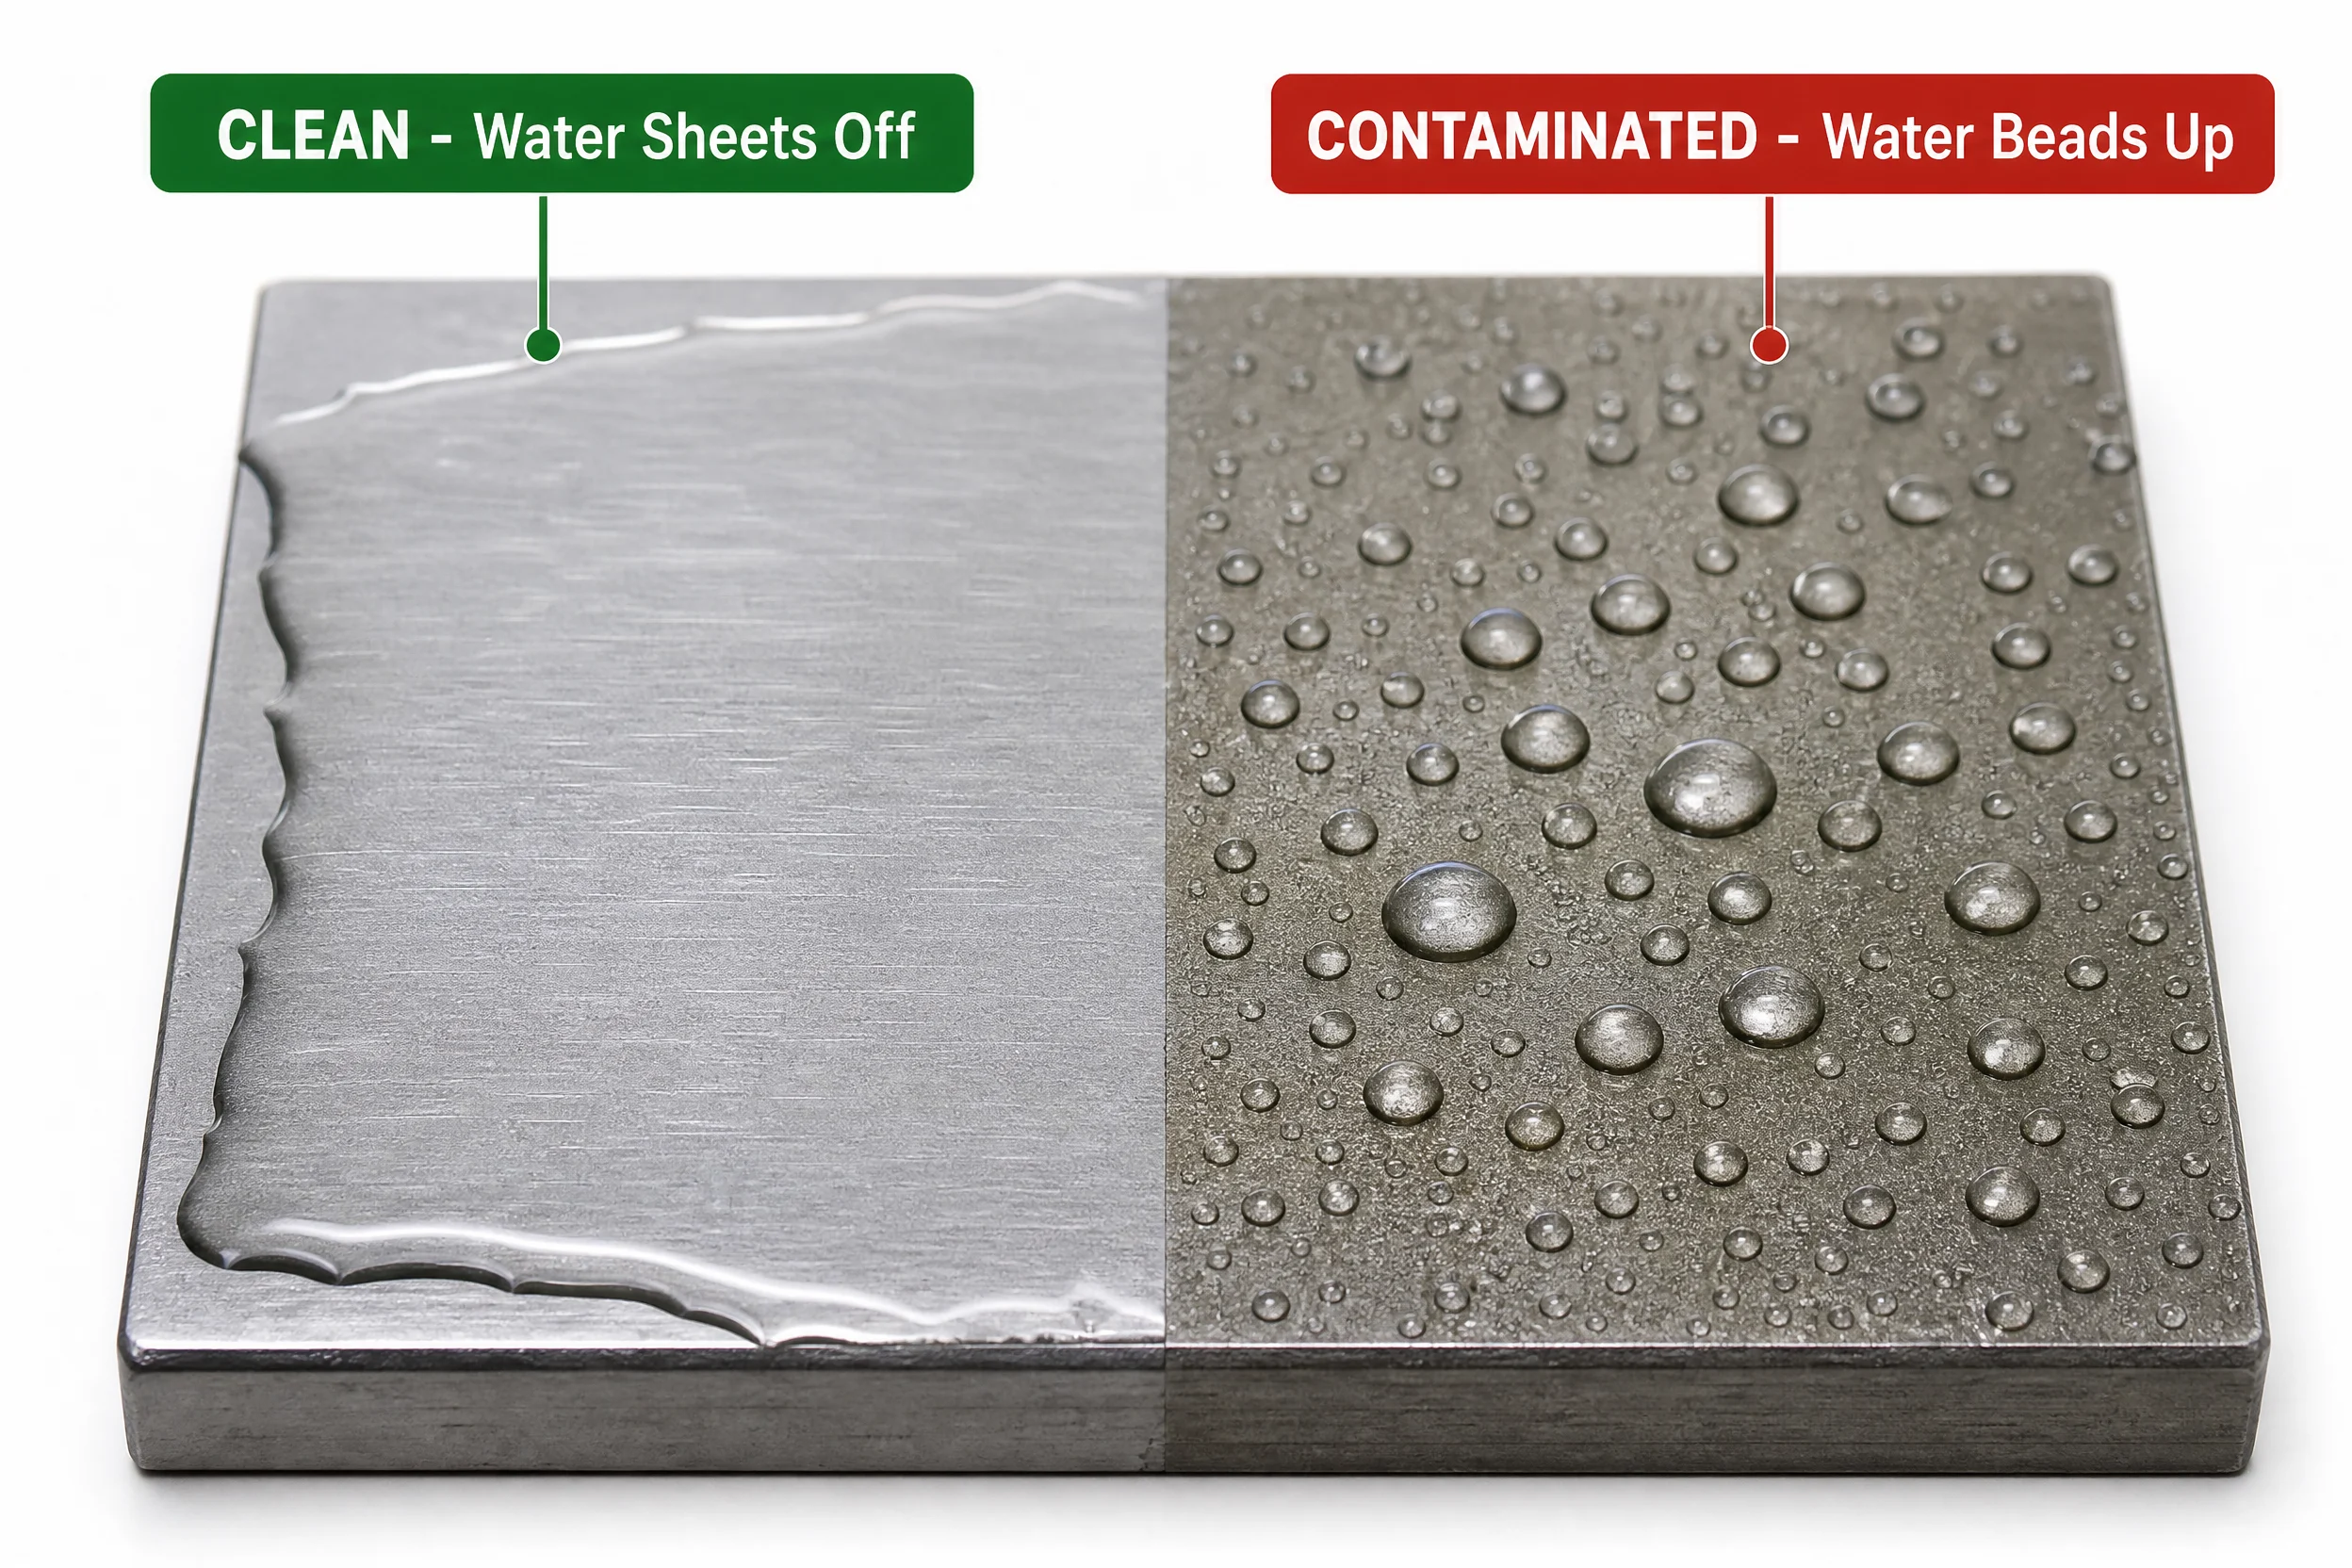
After degreasing, rinse the part under distilled water. If the water sheets off uniformly, the surface is clean. If the water beads up or breaks into droplets, there’s still oil — degrease and rinse again.
This test costs nothing and takes five seconds. Skipping it is the single most common cause of a blotchy first result.
Step 2: Etching (Optional but Recommended for Vivid Colors)
Etching removes the existing native oxide and creates a fresh, uniform surface for the new oxide to grow on. For knife scales and jewelry where color quality matters, this step makes a visible difference.
Two options for home use:
Whink Rust Stain Remover — Available at hardware stores, contains diluted hydrofluoric acid (HF). Works at room temperature. Dip for 5–10 seconds until small bubbles form, then rinse immediately in distilled water. Effective but leaves the surface slightly hazy on close inspection, which can reduce color vibrancy.
Multi-Etch — A commercial product developed specifically for titanium etching. Used warm (150–160°F / 65–71°C), it creates a surface topography that maximizes light refraction and produces noticeably more saturated, gem-quality colors. More expensive (~$30 for a starter kit), but if you’re doing jewelry or high-visibility decorative work, the color improvement is real.
For functional parts (bolts, fasteners, hardware) where you just want consistent color coding, Whink is fine. For jewelry or EDC pieces where you want the colors to pop, Multi-Etch is worth it.
Step 3: Final Rinse
Whether you etch or not, do a final rinse in fresh distilled water immediately before anodizing. Don’t let the part air-dry — move it into the bath while still wet.
Surface Finish and Color Vibrancy
Surface finish before anodizing has a significant effect on how the final colors look:
- Mirror polish → colors are saturated, jewel-like, maximum vibrancy
- Brushed/satin → colors appear softer, more uniform, less reflective
- Bead-blasted / rough → colors are muted and flat (light scatters rather than reflecting cleanly)
If you want a deep, iridescent blue, polish the surface first. If you want a subtle, matte blue-gray, bead blast it. Both are valid — just know which you’re aiming for before you start.
Step-by-Step: The Anodizing Process
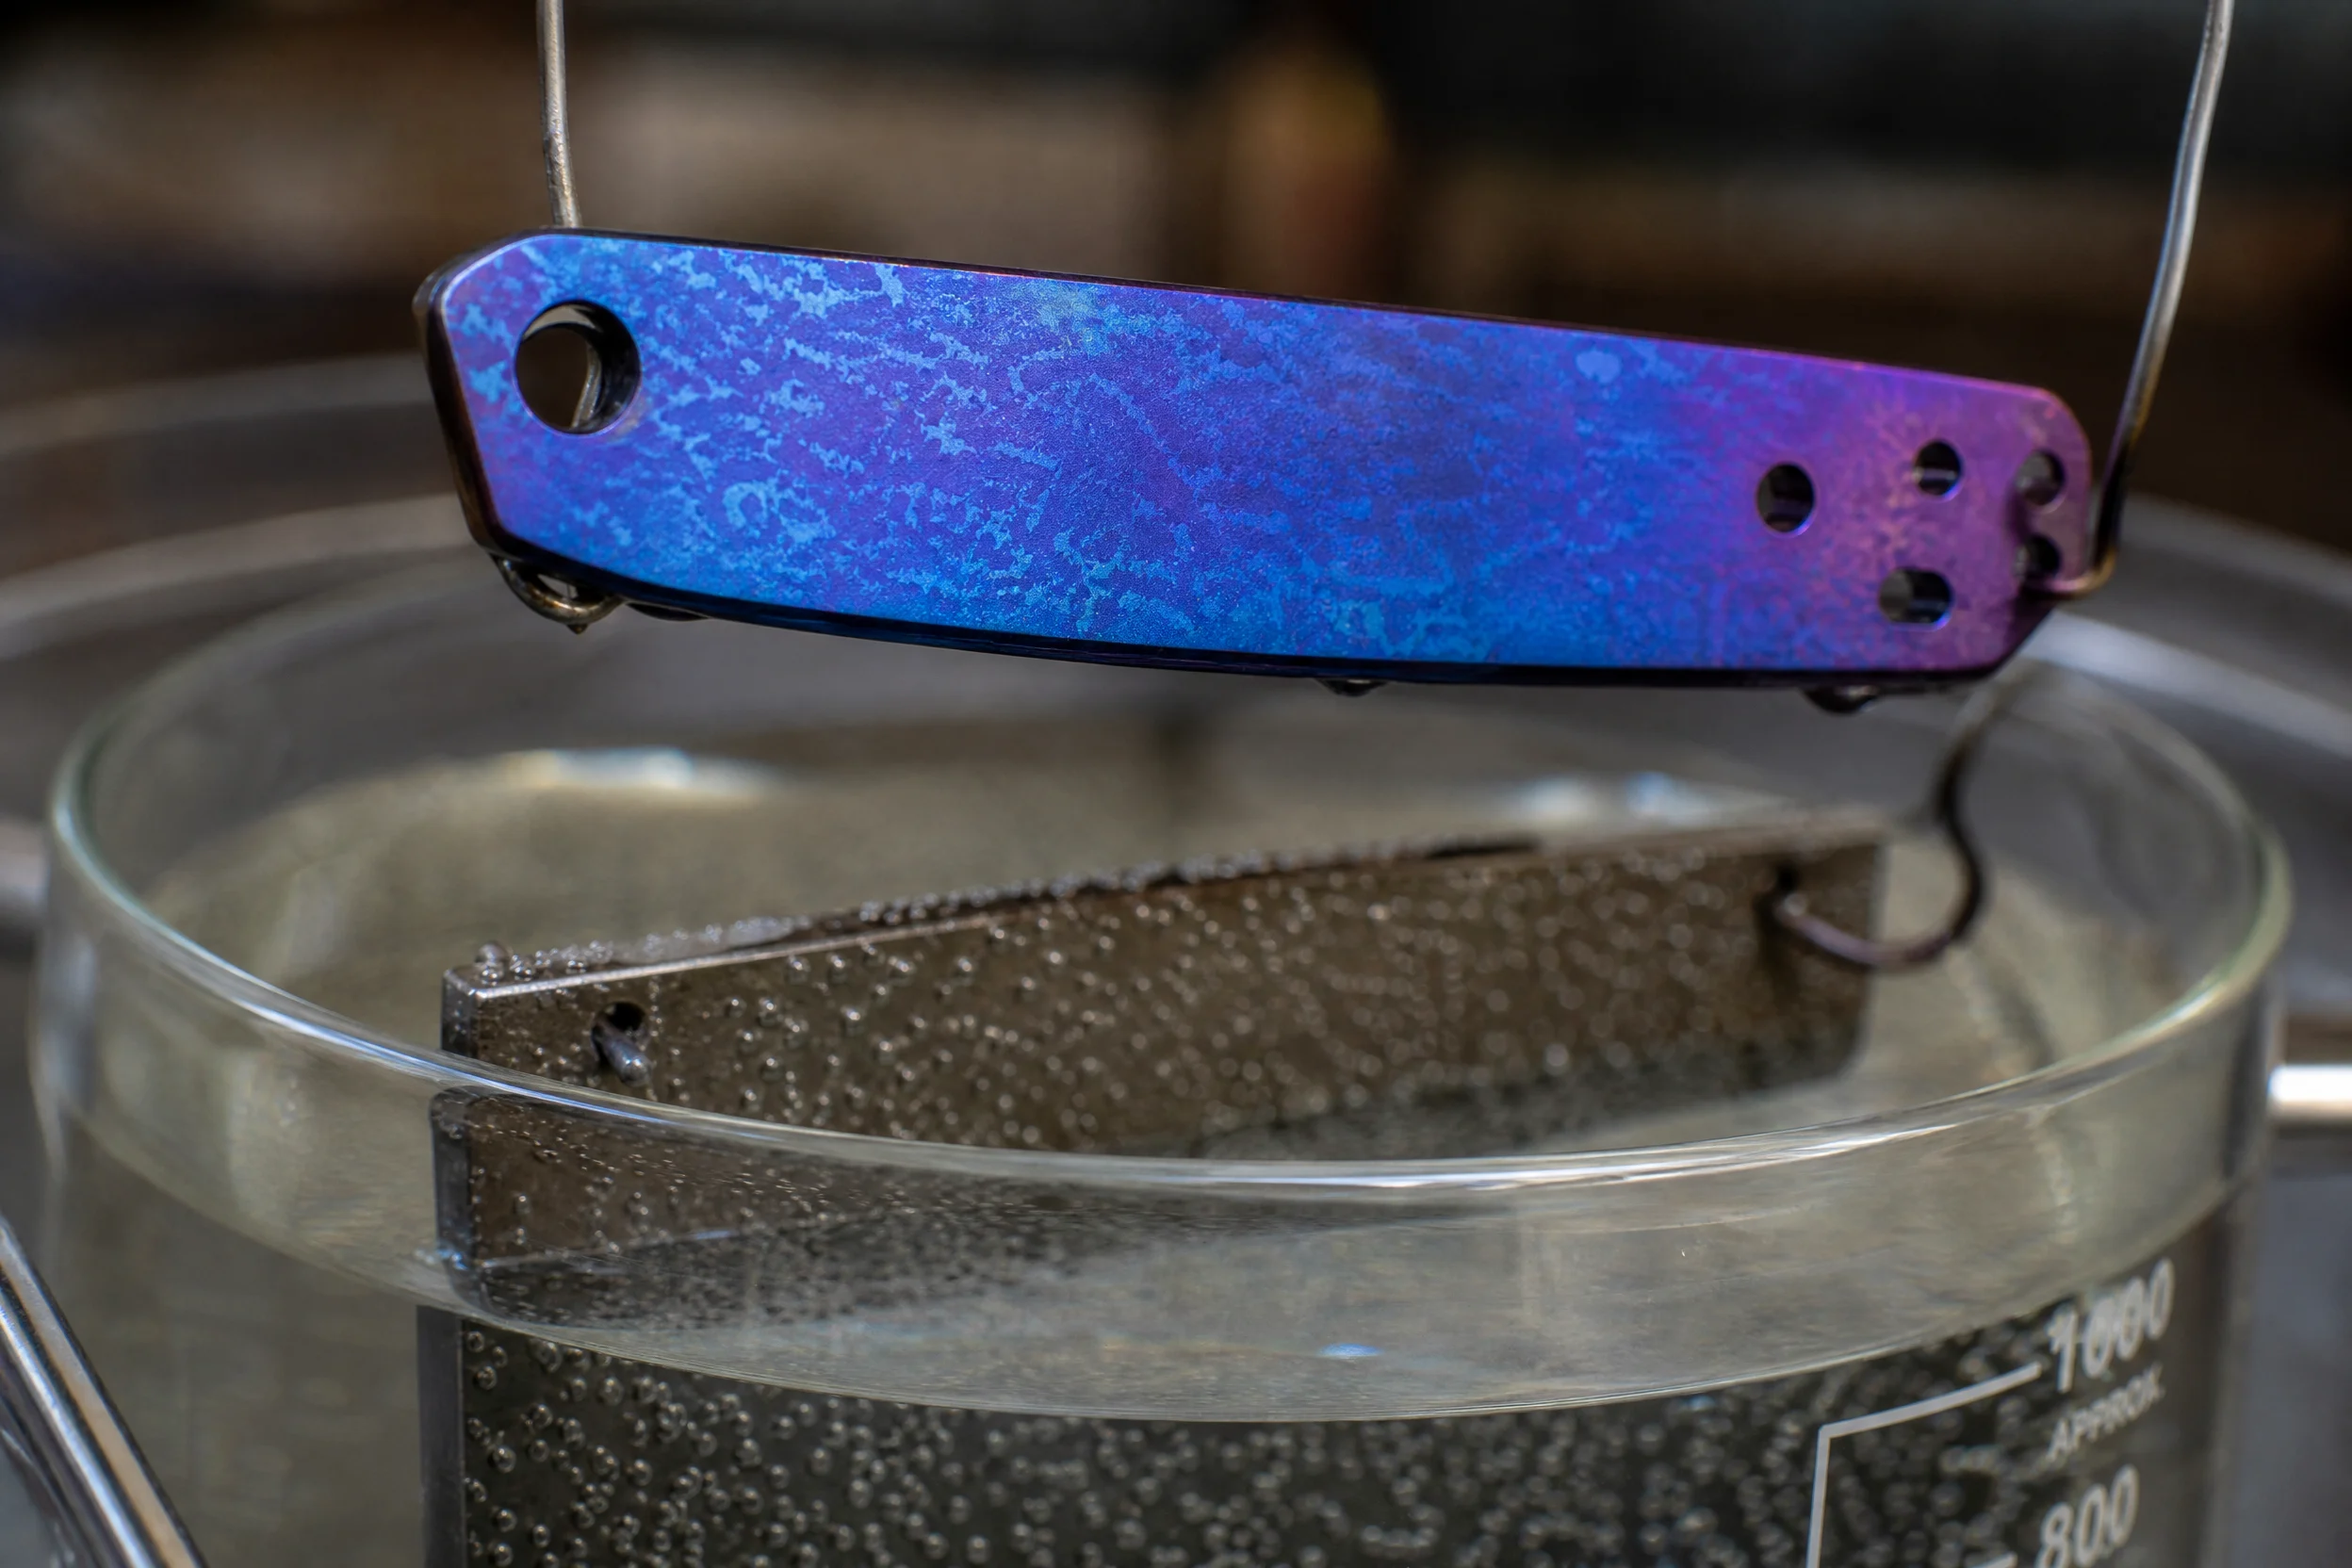
At this point you have: a clean, etched workpiece (never touched bare-handed since cleaning), a power supply set up and off, an electrolyte bath ready, titanium wire anode circuit rigged, and a stainless or titanium cathode submerged.
1. Connect the cathode
Attach the negative (black) lead from the power supply to the cathode plate or mesh. Submerge the cathode in the electrolyte. The cathode should not touch the sides of the container.
2. Rig the workpiece on titanium wire
Hang the workpiece on titanium wire or hold it with titanium tongs. The attachment point will remain the native titanium color (the current enters there, so it doesn’t anodize evenly at the contact point). Plan where you want that silver spot — on an edge that won’t be visible, or at the very end of a handle.
Attach the positive (red) lead to the titanium wire above the electrolyte surface. No copper, no stainless in the bath.
3. Set initial voltage
Set the power supply to 10V below your target color. Do not turn it on yet.
4. Submerge and power on
Lower the workpiece into the bath until fully submerged. The part must not touch the cathode. Turn the power supply on.
You’ll see small bubbles form on the cathode — that’s hydrogen gas releasing, which is normal. The workpiece itself should show little to no bubbling during a clean anodizing run.
5. Creep up to target voltage
Slowly increase the voltage toward your target. Watch the part — you’ll see color develop in real time. Stop when you reach the shade you want.
How long does it take? For a small piece (ring, knife scale) at 30V, you’ll see color form within 10–30 seconds. For larger pieces, it takes longer — the current needs to build the oxide across more surface area. The process naturally self-limits: once the oxide reaches the correct thickness for your voltage, current drops to near zero and the color stops changing.
6. Remove and rinse
Turn off the power supply before removing the part. Removing a live part can cause a momentary arc that leaves a dark mark.
Rinse in distilled water. Blow dry with compressed air, or pat with a clean paper towel and let air dry.
Judge color only after the part is fully dry — wet titanium looks noticeably different from dry.
Stripping and Starting Over
Messed up the color? The process is reversible. For heated Multi-Etch (150–160°F), the oxide strips in 30 seconds to 2 minutes. For room-temperature use, allow 6–40 minutes depending on titanium grade and oxide thickness. Diluted Whink also works at room temperature in a similar timeframe. After stripping, re-prep from Step 1.
Troubleshooting: 6 Problems and Their Real Fixes
Even with a solid setup, you’ll eventually hit one of these. Here’s the actual diagnosis:
| Problem | Likely Cause | Fix |
|---|---|---|
| Splotchy / patchy color | Oil or fingerprints on the surface | Strip, degrease again, pass the water sheet test before re-anodizing |
| Dull / washed-out colors | Surface too rough, or using Whink instead of Multi-Etch | Polish to higher finish; switch to Multi-Etch for etching |
| Color doesn’t form at all | Non-titanium anode wire in the bath, or polarity reversed | Check that anode circuit is all titanium; verify red lead is on the workpiece side |
| Color stops changing mid-process | Oxide has reached equilibrium for current voltage — normal | This is correct behavior; raise voltage slowly to continue |
| Dark burn marks or pitting | Short circuit (part touched cathode), or current too high for contact area | Increase spacing in bath; reduce current limit on supply |
| Color fades near mounting point | Poor contact at titanium wire connection | Tighten the wire connection; use a fresh, clean wire |
The Grade 5 “Muddy Color” Problem
If you’re on Grade 5 titanium and your colors consistently look dark, muted, or grayish instead of bright — that’s not a troubleshooting problem. That’s the material behaving as expected. The only fix is switching to Grade 2 for work where color vibrancy matters.
Overshooting Your Target Color
You dialed up too fast and went past the color you wanted. You can’t reverse this by lowering voltage. Strip the oxide (Multi-Etch or Whink, as described in “Stripping and Starting Over” above), re-etch, and start over with the Creep Up method more slowly next time.
“Why Do My Two Pieces Look Different at the Same Voltage?”
Several factors cause this even with identical voltage:
- Different surface finishes (one was polished, one wasn’t)
- Different titanium grades in the same batch
- Electrolyte temperature (warmer = slightly different oxide growth rate)
- The order pieces were anodized (electrolyte ion depletion over a long session)
If you need two pieces to match exactly, anodize them simultaneously in the same bath, at the same voltage, wired in parallel on the same anode circuit.
Safety: Two Hazards Nobody Talks About
Most guides stop at “don’t touch live electricity.” There are two real hazards that get almost no coverage in DIY tutorials.
Hazard 1: Hydrogen Gas Accumulation
When current flows through the electrolyte, hydrogen gas bubbles off the cathode. At the small scale of home anodizing (a ring, a knife scale), the volume produced is negligible. For larger pieces or longer sessions, hydrogen can accumulate if the workspace isn’t ventilated.
Work with a window open or a fan running. Don’t seal the electrolyte container during the process. Don’t smoke or have open flames nearby while anodizing. This is standard electrochemistry precaution — genuinely important for longer sessions.
Hazard 2: Titanium Dust (Often Overlooked)
The anodizing process itself is cold and safe. The hazard comes in preparation — if you’re sanding, grinding, or polishing titanium before anodizing.
Fine titanium dust and swarf is highly flammable. Titanium fires cannot be extinguished with water or standard CO₂ extinguishers (water decomposes into hydrogen and accelerates combustion; titanium can even continue burning in nitrogen at high temperatures, forming titanium nitride). You need a Class D metal fire extinguisher or a bucket of dry sand if you’re doing any mechanical work on titanium. This is an NFPA-recognized hazard for titanium dust specifically — the bulk metal is not a fire risk under normal conditions.
This won’t be an issue for most DIYers anodizing pre-machined parts. But if you’re finishing raw stock, grinding titanium, or polishing aggressively with power tools, it’s a real risk that most tutorials skip entirely.
The Electrical Side
The voltages involved (up to 120V DC) are high enough to be dangerous, but the current is low (milliamps to a few amps). Main precautions:
- Don’t work with wet hands on live connections
- Don’t let lead connections slip into the electrolyte
- Turn off the power supply before removing the workpiece
- Use a bench supply with current limiting — set a current limit before you start to prevent runaway current if something shorts
Frequently Asked Questions
How many volts do I need to anodize titanium blue?
Sky blue / light blue appears between 30–40V. A deeper purple-blue starts around 20–25V. For the most accurate result, use the Creep Up method: start at 20V and slowly increase while the part is submerged, stopping when you hit the shade you want.
Can you anodize titanium with a 9V battery?
Technically yes — a 9V battery produces rough bronze/gold tones at the low end of the spectrum. But you have zero voltage control, making precision color selection impossible. For anything beyond a rough first experiment, a variable DC bench supply (0–120V) is the right tool.
What’s the best electrolyte for titanium anodizing at home?
TSP (trisodium phosphate) or Borax at 5g per liter of distilled water. Both work equally well at this concentration. Avoid anything containing chlorides — they etch rather than anodize.
Why are my colors dull or muted?
Three most common causes: (1) Surface is too rough — polish to a higher finish for more vivid color; (2) You’re using Grade 5 (Ti-6Al-4V) instead of Grade 2 — alloy elements in Grade 5 produce inherently muted colors; (3) You used Whink for etching — Multi-Etch produces better color saturation.
Does anodized titanium fade or wear off?
Fading: never. The color is a structural property of the oxide layer, UV stable, with no dye to break down. Wear: yes, over time. The oxide layer is very thin, so abrasion will eventually scratch through it and reveal bare silver metal underneath.
Can you anodize titanium black?
No. Anodizing is an optical process based on light interference. Achieving true black requires absorbing all light, which the thin transparent oxide cannot do. “Black titanium” products use PVD or DLC coating, not anodizing.
How do I strip anodizing off titanium?
Heated Multi-Etch (150–160°F) removes the oxide in 30 seconds to 2 minutes. Room-temperature Multi-Etch or diluted Whink takes 6–40 minutes depending on the titanium grade and how heavy the oxide is.
Does titanium grade affect anodizing results?
Significantly. Grade 2 (commercially pure) produces bright, gem-quality colors. Grade 5 (Ti-6Al-4V) produces the same color spectrum but notably more muted, due to alloying elements disrupting the oxide layer’s optical purity. For decorative or jewelry work, Grade 2 is the better choice.
What I’ve Learned From Getting It Wrong
The first time I anodized a titanium piece at home, I got a patchy, uneven blue on what was supposed to be a clean knife scale. I blamed the power supply. It was my hands — I’d handled the part without gloves after the acetone wipe, and the fingerprint oils had survived the rinse. The water sheet test would have caught it, but I skipped it.
The second failure was overshooting green while targeting blue — I dialed up too fast because I thought “more voltage = more vivid,” and ended up somewhere between teal and lime. Had to strip and restart.
Third lesson: Grade 5 ≠ Grade 2. I had a beautiful Grade 2 blue in my head, but the scales I was working with were Grade 5, and the result was a decent-looking muted slate blue — not what I was after. Fine for the application, but not what I planned.
The cumulative lesson: the chemistry is trivially easy, and the setup is straightforward. The failures come entirely from prep and process discipline — gloves, cleanliness, slow voltage creep, knowing your material. Once you’ve internalized those, the results become reliably repeatable.
Conclusion
Titanium anodizing is one of the few metalworking processes where the learning curve is genuinely short once you understand the mechanism. The physics — thin-film interference driven by oxide thickness, controlled by voltage — is elegant and predictable once you’ve seen it work.
The setup costs are low (a decent bench supply runs $60–120, everything else is under $30 total), the process is reversible, and once you’ve done one clean successful run, you’ve essentially figured it out.
The two things worth repeating: surface prep is not optional, and Grade 2 titanium gives you colors that Grade 5 simply cannot match. Everything else — electrolyte concentration, cathode choice, container type — is secondary.